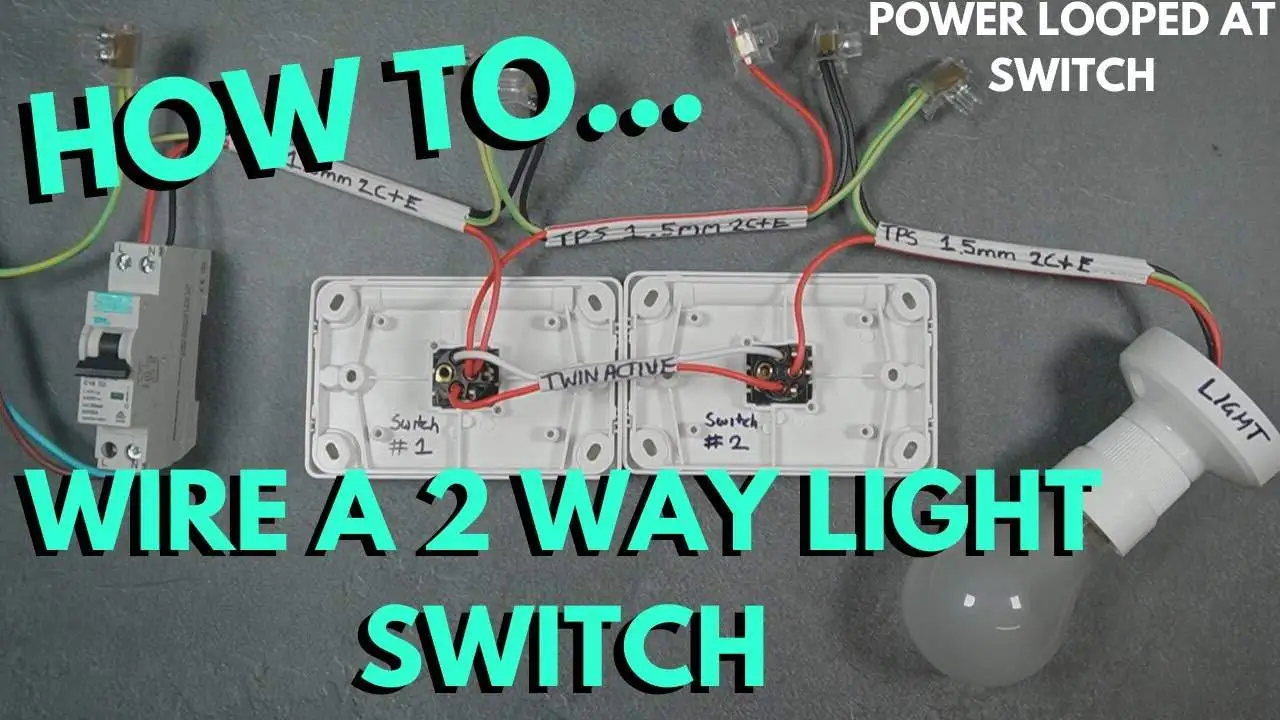
Guide To Wire A 2-Way Light Switch
Learn how to wire a 2-way light switch effectively. This guide covers essential tools, step-by-step instructions, and safety measures for
It would be difficult for an individual to wire a 2-way light switch on his own without any proper electrical knowledge and professional help. However, what if we tell you that you can wire a two-way switch with the help of proper tools, the right assistance, and safety measures?
Yes, you read it right. In this article, we will help you understand the whole process of wiring a 2-way switch. From designing a structure of primary wiring to proper installation, this blog by Vorlane helps you understand all the necessary information you may need to understand the wiring process of a two-way light switch.
With this kind of switch, you can control both single lights or multiple lights from different locations. This type of switch is preferable in hallways, staircases, and big rooms where you can switch on and off the lights from both sides. A conventional single-way switch has a single way to control the switch. Unlike that, the 2-way switch has two options.
Every 2-way switch operates through an electrical circuit that can be turned on and off from any switch at your convenience. This setup works with the help of three wires. One common wire is mostly called ‘c’ or ‘com,’ and the other two traveler wires are L2 and L1. When you press the switch, the electrical current flows through it, turning the light on and off.
One can easily fall prey to danger while doing electricity work without any precautionary measures. Electrical safety protocols are necessary to follow in order to prevent any unwanted events later. Precautions to follow:
Turn Off the Power: Switch off the circuit breaker before doing electrical work. Make sure the power is completely off with the help of a voltage tester.
Use Insulated Tools: Make sure to use insulated tools to prevent the danger of electric shock.
Wear Safety Gear: Wear safety glasses and gloves to protect from debris and electric shock.
Follow Local Codes: Carefully follow all the regulations and electric codes. In case of any confusion, get professional help.
Turn Off the Power: Find the circuit breaker before working on it and turn it off. Make sure the power is completely off with the help of the voltage circuit.
Run the Electrical Wire: Use an electrical wire starting from the first switch to the light fixture and from the light to the other switch location. For this setup, you need three wires: white, black, and ground ( green or bare).
Connect the Ground Wire: Now, join the ground wire and ground terminal on a switch. This is mostly one green screw.
Connect the Common Terminal: Connect the live black wire of the power source to the COM of the primary switch. You can mark common terminals with different color labels or even screws.
Connect the Traveler Wires: Now, take two traveler wires and attach them both with the L1 and L2 sides of the switch. These terminals often come with bronze screws.
Connect the Ground Wire: From the power source, join the ground wire to the ground terminal of light fixtures.
Connect the Neutral Wire: Join the neutral wire of its power source with a neutral terminal of light fixtures.
Connect the Live Wire: Now from a common terminal, join the black wire to its live terminal of the light fixture.
Connect the Ground Wire: Join the ground wire with the ground terminal in the second switch.
Connect the Common Terminal: Connect the live black wire of the light fixture to its common terminal within the second switch.
Connect the Traveler Wires: Connect two traveler wires of the first switch to the L2 and L1 terminals of the second switch. Make sure the same wires from both sides are connected to the same terminals.
Turn On the Power: After making all connections, turn on the power from the circuit breaker.
Test the Switches: Make sure the light can turn off and on from either side by toggling the switch from each location. In case of any unexpected issue, double-check the connections and make sure that wires are properly attached to the terminals.
In order to wire 2-way light switches, you might face some issues. Here are a few tips to avoid them:
Light Doesn’t Turn On: Double-check every connection to make sure they are correct and secure. Check if the power from the circuit breaker is on.
Light Only Works from One Switch: Make sure that traveler wires connect to relevant terminals from both switches.
Switches Work Intermittently: Cross-check if there are any damaged wires or loose connections. Fix every terminal screw and change the faulty wires.
Sparks or Flickering Lights: This indicates a short circuit or loose connection. Switch off the electric power at once and check the wiring. If you have any confusion, always get help from a professional electrician.
Compatibility: Check the compatibility of the intelligent switch with the wiring of your space and current switching setup. Smart switches normally need neutral wires, which are absent in older installations.
Wiring Adjustments: Smart switch wiring in two-way circuits is different from conventional wiring. Carefully consider every instruction given by the manufacturer. Many smart switches work as wireless communication for interaction and this eliminates the requirement of travelers wires.
Functionality: Smart switches come with features like integration with smart home appliances, energy monitoring, and scheduling. Select a switch according to your requirements to get expected control and alliance with the ecosystem of your home.
Select the Right Smart Switch: Choose a switch that suits your desired features and technical requirements.
Install the Smart Switch: Change one or even both conventional switches with modern, smart switches with the help of the manufacturer’s wiring map and instructions.
Configure and Test: After completing the installation, arrange the switch with the help of the app given by the manufacturer. The app connectivity allows you to check the effectiveness of this 2-way Licht switch from any place.
Installing a two-way light switch improves the overall functionality of lights in your home and office. The flexible and convenient nature of a 2-way light switch allows you to perform your task easily without panicking about which side to turn on and turn off.
Never underestimate the regulations and standards of electrical safety protocols. Each electrical code is specially designed to ease your way and allow you to have a safe electrical experience. Therefore, if you are considering installing a 2-way light switch at your place, ensure you have all the right tools, equipment, and electrical knowledge for safe and effective wiring.
Wir bei Vorlane offer a consultation meeting to our clients to help them better perform their electrical tasks.

Learn how to wire a 2-way light switch effectively. This guide covers essential tools, step-by-step instructions, and safety measures for

Choosing the right power supply for LED strip lights ensures performance and safety. Consider voltage, current, wattage, efficiency, and certifications.

Discover the benefits of pendant lighting for your home. Learn about various styles, and their uses in enhancing aesthetics and
Melden Sie sich an, um die neuesten Produktankündigungen und Angebote zu erhalten.
*Wir respektieren Ihre Vertraulichkeit und alle Informationen sind geschützt.


 | Dieser Forschungsbericht zur LED-Branche ist 10.000 Dollar wert!Möchten Sie zuverlässige Branchendaten zur Unterstützung Ihrer LED-Geschäftsplanung erhalten? In diesem Bericht werden Sie:
*Senden Sie Ihre E-Mail-Adresse, um diese Datei herunterzuladen. Ihre persönlichen Daten werden nicht an Dritte oder Organisationen weitergegeben. |
WhatsApp uns
*Wir respektieren Ihre Vertraulichkeit und alle Informationen sind geschützt.
